aws
What is Amazon AWS DevOps Guru?
AWS DevOps Guru is a machine learning service that monitors your AWS resources and CloudFormation stacks and alerts you when adverse conditions are...
CloudFormation is a method of provisioning AWS infrastructure using code. It allows you to model a collection of related resources, both AWS and third party, to provision them quickly and consistently.
AWS CloudFormation also provides you with a mechanism to manage the resources through their lifecycle.
CloudFormation is designed to help you manage your AWS resources, especially associated resources. You can use CloudFormation to group resources with dependencies into stacks using templates.
Before getting into the details, did you know you can use Hava to visualise what you have deployed via AWS Cloudformation? Diagrams are auto generated and kept up to date.

CloudFormation works by defining your AWS resources in a structured text file in either JSON or YAML formats. This is known as a CloudFormation template. Using the template, you then create a CloudFormation stack in AWS which contains all the resources you defined.
To manage your resources you amend your CloudFormation template and update it, which will execute the changes to the resources in your stack.
When you make changes, CloudFormation tracks the template and executes the changes or optionally creates a “Change Set” for approval.
Best Practice Automation
With CloudFormation you can integrate with DevOps and GitOps best practices like establishing a Git repository and deploying infrastructure through a CI/CD pipeline. This allows you to audit changes and trigger deployments using pipeline integration tools like AWS CodePipeline and GitHub Actions.
Global Scaling and Deployment
Templates help simplify scaling in that you can apply best practices and company policy requirements within your templates that can then be used in CloudFormation StackSets to create, update and delete stacks across multiple AWS regions and accounts.
AWS Service Integration
CloudFormation meshes in with many other AWS services to automate resource and security management. CloudFormation will integrate with AWS Identity and Access Management (IAM) for secure access control, AWS Config for best practice compliance and builder tools like AWS CodePipeline to implement the latest DevOps best practices for improving automation, testing and deployment.
Manage private and 3rd party resources
You can provision and manage 3rd party resources like monitoring, CI/CD and version control using the open source CloudFormation CLI to build your own resource providers.
Managing your Infrastructure using code.
With CloudFormation you can manage all your infrastructure using code. Infrastructure management can be approached as if it were application code. Different users can create CloudFormation templates and submit them to your code repository for review. Once approved, the template can be merged into your main branch.
Merging to your main branch initiates the build process that will create your new AWS resources.

Cost reduction at the development stage.
If you are working on proof of concept or learning new services or resource types, CloudFormation allows you to quickly spin up or destroy a stack of related resources. This means you can spin up a group of resources for development and testing, but easily destroy them when they are not in use. As you move into production, you can quickly deploy from your templates and scale up as needed.
Disaster Recovery
If you have a catastrophic infrastructure failure you can easily recreate your infrastructure in a different region or account from your CloudFormation templates quickly to assist in the disaster recovery process.
There are a number of other considerations when adopting CloudFormation to manage your AWS infrastructure provisioning. While it is possible to create your Cloudformation stacks manually from the console, AWS recommends adopting a CI/CD pipeline so that code updates can be better managed before merging to your main branch to deploy infrastructure.
It is also important to avoid manual changes to your stack infrastructure when you are using CloudFormation. Always use your templates to update infrastructure otherwise changes made manually will almost certainly be lost.
CloudFormation is essentially free to use. You only pay for the API calls CloudFormation makes on your behalf and the resources you provision, which is no different than manually creating them.
There is also a small per operation charge if you are managing third party resources.
CloudFormation pricing details can be found here
Basically any AWS resources you can create from the AWS console can be provisioned within a CloudFormation template. This includes things like
Templates are constructed of structured text. The declarations in your CloudFormation stack templates are written in JSON or YAML formats.
A stack is a collection of AWS resources provisioned by a template that you can manage as a single unit.
A StackSet is a named set of stacks that use the same template that is used to provision resources across different accounts and regions. This enables a single operation to create, update or delete stacks across multiple regions and accounts.
To create a CloudFormation stack from the AWS console follow the steps below. In this example we’ll use a sample YAML template provided by AWS.
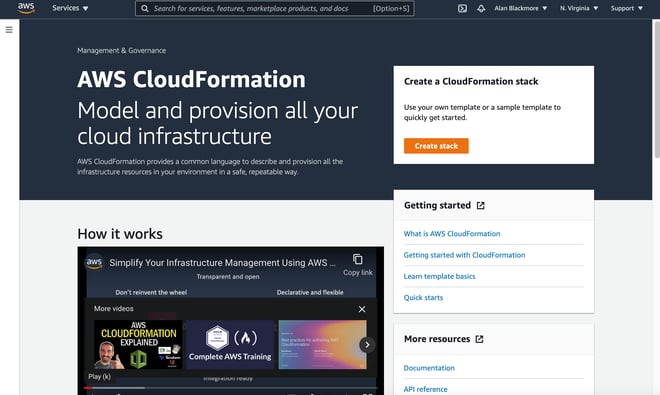
The first step is to navigate to the CloudFormation Service on your Services console which can be found under “Management and Governance”
The first step is to click on create stack:
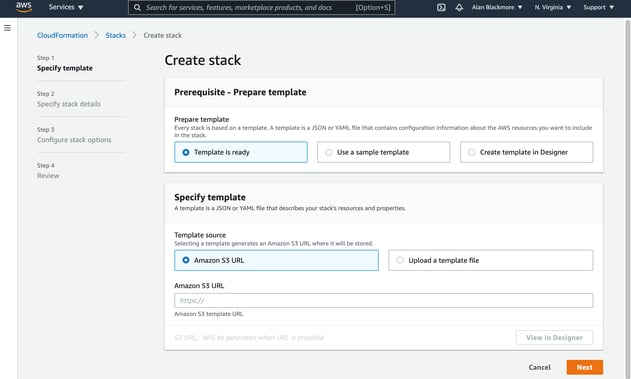
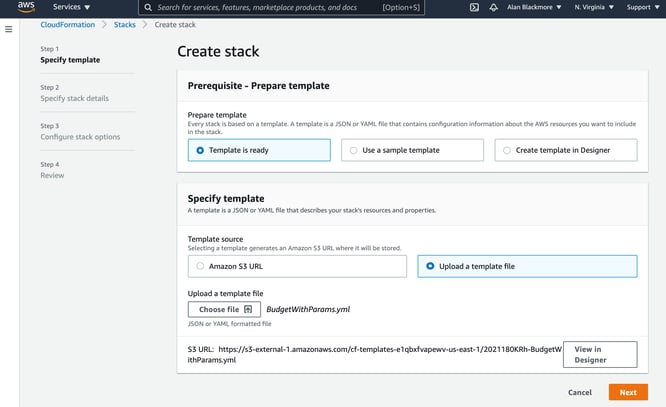
In this example we’ll tell CloudFormation our template is ready and that we want to upload it.
At this point you have the ability to enter the location of a template stored in a S3 bucket or you can use a sample template for common stacks like:
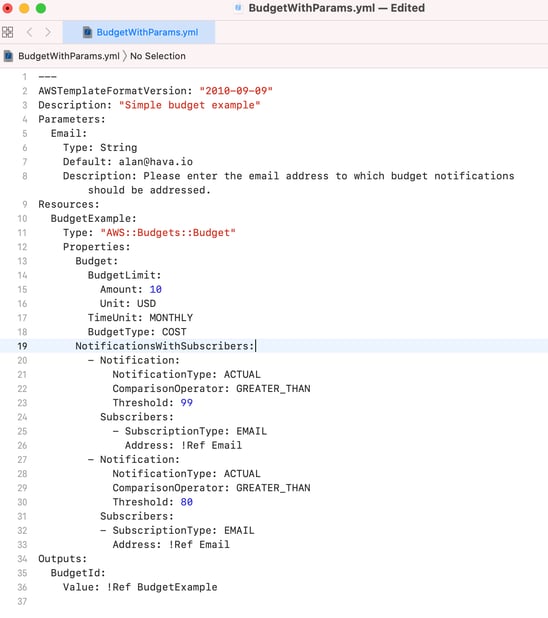
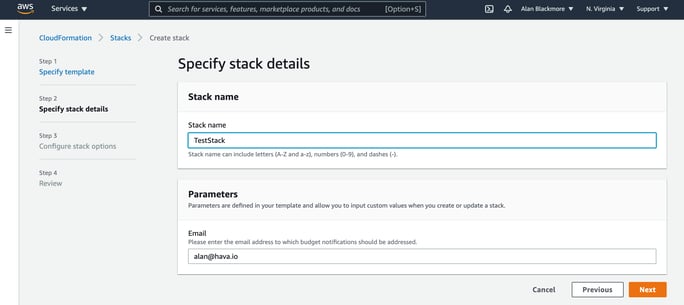
On the next step you need to name your stack and complete any parameters that were defined in the template. In this budget example, we have an email parameter that will receive the budget notifications.
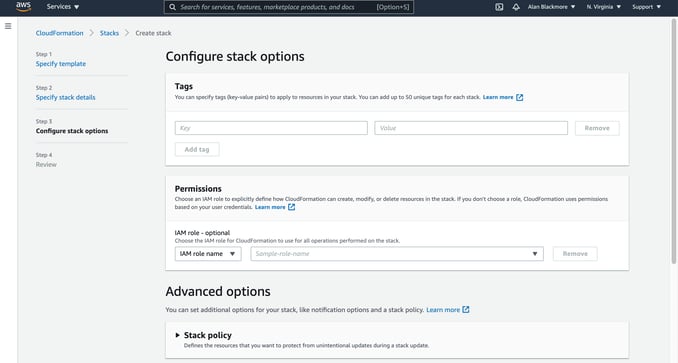
In the next step you can specify up to 50 tag key/value pairs that will be attached to all the resources created when you create your stack.
You can nominate an IAM role to use for the stack. If you do not specify a role, then the permissions will be based on the user credentials being used to create the stack.
There are also some advanced options:
Stack Policy: This is a JSON document that defines the update actions that can be performed on nominated resources. This allows you to protect resources from unintentional updates during a stack update.
Rollback Configuration: This allows you to specify a CloudWatch alarm and time period to monitor CloudFormation when creating or updating a stack. If the operation breaches an alarm threshold, the update operation is rolled back.
Notification Options: Here, you can specify a SNS topic ARN to send notifications to.
Stack Creation Options: Here, you can specify whether to roll back on failure, specify a stack creation timeout period and set the stack termination protection. If the termination protection is enabled, your stack cannot be deleted until you update the setting via stack actions.
The final step is a review page that allows you to review and amend the options before selecting the “Create Stack”
This will start creating the stack and report back the status of each event as it is performed. Once complete all your resources will show a status of “CREATE_COMPLETE”
If you have the AWS command line interface installed and configured, you can use the CLI to create a stack using the “create-stack” command.
The command will require you to supply a stack name and a template which can be hosted on S3 or be a file locally on your computer.

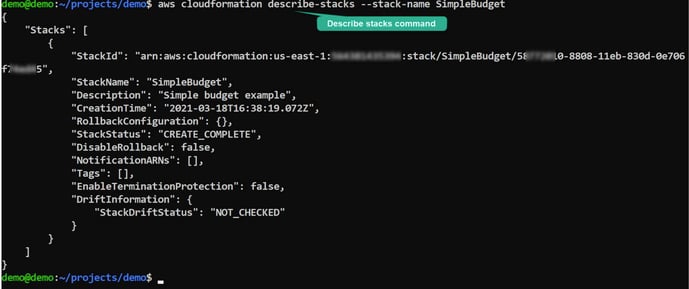
The “describe-stacks” command entered in the CLI will return basic information about your stacks.
CloudFormation templates can get large and complex. This is an example of the sample template provided by AWS to create a Wordpress installation with a MySQL database to handle the storage.
AWSTemplateFormatVersion: 2010-09-09
Description: >-
  AWS CloudFormation Sample Template WordPress_Single_Instance: WordPress is web
  software you can use to create a beautiful website or blog. This template
  installs WordPress with a local MySQL database for storage. It demonstrates
  using the AWS CloudFormation bootstrap scripts to deploy WordPress.
  **WARNING** This template creates an Amazon EC2 instance. You will be billed
  for the AWS resources used if you create a stack from this template.
Parameters:
  KeyName:
    Description: Name of an existing EC2 KeyPair to enable SSH access to the instances
    Type: 'AWS::EC2::KeyPair::KeyName'
    ConstraintDescription: must be the name of an existing EC2 KeyPair.
  InstanceType:
    Description: WebServer EC2 instance type
    Type: String
    Default: t2.small
    AllowedValues:
      - t1.micro
      - t2.nano
      - t2.micro
      - t2.small
      - t2.medium
      - t2.large
      - m1.small
      - m1.medium
      - m1.large
      - m1.xlarge
      - m2.xlarge
      - m2.2xlarge
      - m2.4xlarge
      - m3.medium
      - m3.large
      - m3.xlarge
      - m3.2xlarge
      - m4.large
      - m4.xlarge
      - m4.2xlarge
      - m4.4xlarge
      - m4.10xlarge
      - c1.medium
      - c1.xlarge
      - c3.large
      - c3.xlarge
      - c3.2xlarge
      - c3.4xlarge
      - c3.8xlarge
      - c4.large
      - c4.xlarge
      - c4.2xlarge
      - c4.4xlarge
      - c4.8xlarge
      - g2.2xlarge
      - g2.8xlarge
      - r3.large
      - r3.xlarge
      - r3.2xlarge
      - r3.4xlarge
      - r3.8xlarge
      - i2.xlarge
      - i2.2xlarge
      - i2.4xlarge
      - i2.8xlarge
      - d2.xlarge
      - d2.2xlarge
      - d2.4xlarge
      - d2.8xlarge
      - hi1.4xlarge
      - hs1.8xlarge
      - cr1.8xlarge
      - cc2.8xlarge
      - cg1.4xlarge
    ConstraintDescription: must be a valid EC2 instance type.
  SSHLocation:
    Description: The IP address range that can be used to SSH to the EC2 instances
    Type: String
    MinLength: '9'
    MaxLength: '18'
    Default: 0.0.0.0/0
    AllowedPattern: '(\d{1,3})\.(\d{1,3})\.(\d{1,3})\.(\d{1,3})/(\d{1,2})'
    ConstraintDescription: must be a valid IP CIDR range of the form x.x.x.x/x.
  DBName:
    Default: wordpressdb
    Description: The WordPress database name
    Type: String
    MinLength: '1'
    MaxLength: '64'
    AllowedPattern: '[a-zA-Z][a-zA-Z0-9]*'
    ConstraintDescription: must begin with a letter and contain only alphanumeric characters.
  DBUser:
    NoEcho: 'true'
    Description: The WordPress database admin account username
    Type: String
    MinLength: '1'
    MaxLength: '16'
    AllowedPattern: '[a-zA-Z][a-zA-Z0-9]*'
    ConstraintDescription: must begin with a letter and contain only alphanumeric characters.
  DBPassword:
    NoEcho: 'true'
    Description: The WordPress database admin account password
    Type: String
    MinLength: '8'
    MaxLength: '41'
    AllowedPattern: '[a-zA-Z0-9]*'
    ConstraintDescription: must contain only alphanumeric characters.
  DBRootPassword:
    NoEcho: 'true'
    Description: MySQL root password
    Type: String
    MinLength: '8'
    MaxLength: '41'
    AllowedPattern: '[a-zA-Z0-9]*'
    ConstraintDescription: must contain only alphanumeric characters.
Mappings:
  AWSInstanceType2Arch:
    t1.micro:
      Arch: HVM64
    t2.nano:
      Arch: HVM64
    t2.micro:
      Arch: HVM64
    t2.small:
      Arch: HVM64
    t2.medium:
      Arch: HVM64
    t2.large:
      Arch: HVM64
    m1.small:
      Arch: HVM64
    m1.medium:
      Arch: HVM64
    m1.large:
      Arch: HVM64
    m1.xlarge:
      Arch: HVM64
    m2.xlarge:
      Arch: HVM64
    m2.2xlarge:
      Arch: HVM64
    m2.4xlarge:
      Arch: HVM64
    m3.medium:
      Arch: HVM64
    m3.large:
      Arch: HVM64
    m3.xlarge:
      Arch: HVM64
    m3.2xlarge:
      Arch: HVM64
    m4.large:
      Arch: HVM64
    m4.xlarge:
      Arch: HVM64
    m4.2xlarge:
      Arch: HVM64
    m4.4xlarge:
      Arch: HVM64
    m4.10xlarge:
      Arch: HVM64
    c1.medium:
      Arch: HVM64
    c1.xlarge:
      Arch: HVM64
    c3.large:
      Arch: HVM64
    c3.xlarge:
      Arch: HVM64
    c3.2xlarge:
      Arch: HVM64
    c3.4xlarge:
      Arch: HVM64
    c3.8xlarge:
      Arch: HVM64
    c4.large:
      Arch: HVM64
    c4.xlarge:
      Arch: HVM64
    c4.2xlarge:
      Arch: HVM64
    c4.4xlarge:
      Arch: HVM64
    c4.8xlarge:
      Arch: HVM64
    g2.2xlarge:
      Arch: HVMG2
    g2.8xlarge:
      Arch: HVMG2
    r3.large:
      Arch: HVM64
    r3.xlarge:
      Arch: HVM64
    r3.2xlarge:
      Arch: HVM64
    r3.4xlarge:
      Arch: HVM64
    r3.8xlarge:
      Arch: HVM64
    i2.xlarge:
      Arch: HVM64
    i2.2xlarge:
      Arch: HVM64
    i2.4xlarge:
      Arch: HVM64
    i2.8xlarge:
      Arch: HVM64
    d2.xlarge:
      Arch: HVM64
    d2.2xlarge:
      Arch: HVM64
    d2.4xlarge:
      Arch: HVM64
    d2.8xlarge:
      Arch: HVM64
    hi1.4xlarge:
      Arch: HVM64
    hs1.8xlarge:
      Arch: HVM64
    cr1.8xlarge:
      Arch: HVM64
    cc2.8xlarge:
      Arch: HVM64
  AWSInstanceType2NATArch:
    t1.micro:
      Arch: NATHVM64
    t2.nano:
      Arch: NATHVM64
    t2.micro:
      Arch: NATHVM64
    t2.small:
      Arch: NATHVM64
    t2.medium:
      Arch: NATHVM64
    t2.large:
      Arch: NATHVM64
    m1.small:
      Arch: NATHVM64
    m1.medium:
      Arch: NATHVM64
    m1.large:
      Arch: NATHVM64
    m1.xlarge:
      Arch: NATHVM64
    m2.xlarge:
      Arch: NATHVM64
    m2.2xlarge:
      Arch: NATHVM64
    m2.4xlarge:
      Arch: NATHVM64
    m3.medium:
      Arch: NATHVM64
    m3.large:
      Arch: NATHVM64
    m3.xlarge:
      Arch: NATHVM64
    m3.2xlarge:
      Arch: NATHVM64
    m4.large:
      Arch: NATHVM64
    m4.xlarge:
      Arch: NATHVM64
    m4.2xlarge:
      Arch: NATHVM64
    m4.4xlarge:
      Arch: NATHVM64
    m4.10xlarge:
      Arch: NATHVM64
    c1.medium:
      Arch: NATHVM64
    c1.xlarge:
      Arch: NATHVM64
    c3.large:
      Arch: NATHVM64
    c3.xlarge:
      Arch: NATHVM64
    c3.2xlarge:
      Arch: NATHVM64
    c3.4xlarge:
      Arch: NATHVM64
    c3.8xlarge:
      Arch: NATHVM64
    c4.large:
      Arch: NATHVM64
    c4.xlarge:
      Arch: NATHVM64
    c4.2xlarge:
      Arch: NATHVM64
    c4.4xlarge:
      Arch: NATHVM64
    c4.8xlarge:
      Arch: NATHVM64
    g2.2xlarge:
      Arch: NATHVMG2
    g2.8xlarge:
      Arch: NATHVMG2
    r3.large:
      Arch: NATHVM64
    r3.xlarge:
      Arch: NATHVM64
    r3.2xlarge:
      Arch: NATHVM64
    r3.4xlarge:
      Arch: NATHVM64
    r3.8xlarge:
      Arch: NATHVM64
    i2.xlarge:
      Arch: NATHVM64
    i2.2xlarge:
      Arch: NATHVM64
    i2.4xlarge:
      Arch: NATHVM64
    i2.8xlarge:
      Arch: NATHVM64
    d2.xlarge:
      Arch: NATHVM64
    d2.2xlarge:
      Arch: NATHVM64
    d2.4xlarge:
      Arch: NATHVM64
    d2.8xlarge:
      Arch: NATHVM64
    hi1.4xlarge:
      Arch: NATHVM64
    hs1.8xlarge:
      Arch: NATHVM64
    cr1.8xlarge:
      Arch: NATHVM64
    cc2.8xlarge:
      Arch: NATHVM64
  AWSRegionArch2AMI:
    af-south-1:
      HVM64: ami-064cc455f8a1ef504
      HVMG2: NOT_SUPPORTED
    ap-east-1:
      HVM64: ami-f85b1989
      HVMG2: NOT_SUPPORTED
    ap-northeast-1:
      HVM64: ami-0b2c2a754d5b4da22
      HVMG2: ami-09d0e0e099ecabba2
    ap-northeast-2:
      HVM64: ami-0493ab99920f410fc
      HVMG2: NOT_SUPPORTED
    ap-northeast-3:
      HVM64: ami-01344f6f63a4decc1
      HVMG2: NOT_SUPPORTED
    ap-south-1:
      HVM64: ami-03cfb5e1fb4fac428
      HVMG2: ami-0244c1d42815af84a
    ap-southeast-1:
      HVM64: ami-0ba35dc9caf73d1c7
      HVMG2: ami-0e46ce0d6a87dc979
    ap-southeast-2:
      HVM64: ami-0ae99b503e8694028
      HVMG2: ami-0c0ab057a101d8ff2
    ca-central-1:
      HVM64: ami-0803e21a2ec22f953
      HVMG2: NOT_SUPPORTED
    cn-north-1:
      HVM64: ami-07a3f215cc90c889c
      HVMG2: NOT_SUPPORTED
    cn-northwest-1:
      HVM64: ami-0a3b3b10f714a0ff4
      HVMG2: NOT_SUPPORTED
    eu-central-1:
      HVM64: ami-0474863011a7d1541
      HVMG2: ami-0aa1822e3eb913a11
    eu-north-1:
      HVM64: ami-0de4b8910494dba0f
      HVMG2: ami-32d55b4c
    eu-south-1:
      HVM64: ami-08427144fe9ebdef6
      HVMG2: NOT_SUPPORTED
    eu-west-1:
      HVM64: ami-015232c01a82b847b
      HVMG2: ami-0d5299b1c6112c3c7
    eu-west-2:
      HVM64: ami-0765d48d7e15beb93
      HVMG2: NOT_SUPPORTED
    eu-west-3:
      HVM64: ami-0caf07637eda19d9c
      HVMG2: NOT_SUPPORTED
    me-south-1:
      HVM64: ami-0744743d80915b497
      HVMG2: NOT_SUPPORTED
    sa-east-1:
      HVM64: ami-0a52e8a6018e92bb0
      HVMG2: NOT_SUPPORTED
    us-east-1:
      HVM64: ami-032930428bf1abbff
      HVMG2: ami-0aeb704d503081ea6
    us-east-2:
      HVM64: ami-027cab9a7bf0155df
      HVMG2: NOT_SUPPORTED
    us-west-1:
      HVM64: ami-088c153f74339f34c
      HVMG2: ami-0a7fc72dc0e51aa77
    us-west-2:
      HVM64: ami-01fee56b22f308154
      HVMG2: ami-0fe84a5b4563d8f27
Resources:
  WebServerSecurityGroup:
    Type: 'AWS::EC2::SecurityGroup'
    Properties:
      GroupDescription: >-
        Enable HTTP access via port 80 locked down to the load balancer + SSH
        access
      SecurityGroupIngress:
        - IpProtocol: tcp
          FromPort: '80'
          ToPort: '80'
          CidrIp: 0.0.0.0/0
        - IpProtocol: tcp
          FromPort: '22'
          ToPort: '22'
          CidrIp: !Ref SSHLocation
  WebServer:
    Type: 'AWS::EC2::Instance'
    Metadata:
      'AWS::CloudFormation::Init':
        configSets:
          wordpress_install:
            - install_cfn
            - install_wordpress
            - configure_wordpress
        install_cfn:
          files:
            /etc/cfn/cfn-hup.conf:
              content: !Join
                - ''
                - - |
                    [main]
                  - stack=
                  - !Ref 'AWS::StackId'
                  - |+

                  - region=
                  - !Ref 'AWS::Region'
                  - |+

              mode: '000400'
              owner: root
              group: root
            /etc/cfn/hooks.d/cfn-auto-reloader.conf:
              content: !Join
                - ''
                - - |
                    [cfn-auto-reloader-hook]
                  - |
                    triggers=post.update
                  - |
                    path=Resources.WebServer.Metadata.AWS::CloudFormation::Init
                  - 'action=/opt/aws/bin/cfn-init -v '
                  - '         --stack '
                  - !Ref 'AWS::StackName'
                  - '         --resource WebServer '
                  - '         --configsets wordpress_install '
                  - '         --region '
                  - !Ref 'AWS::Region'
                  - |+

              mode: '000400'
              owner: root
              group: root
          services:
            sysvinit:
              cfn-hup:
                enabled: 'true'
                ensureRunning: 'true'
                files:
                  - /etc/cfn/cfn-hup.conf
                  - /etc/cfn/hooks.d/cfn-auto-reloader.conf
        install_wordpress:
          packages:
            yum:
              php73: []
              php73-mysqlnd: []
              mysql57: []
              mysql57-server: []
              mysql57-devel: []
              mysql57-libs: []
              httpd24: []
          sources:
            /var/www/html: 'http://wordpress.org/latest.tar.gz'
          files:
            /tmp/setup.mysql:
              content: !Join
                - ''
                - - 'CREATE DATABASE '
                  - !Ref DBName
                  - |
                    ;
                  - CREATE USER '
                  - !Ref DBUser
                  - '''@''localhost'' IDENTIFIED BY '''
                  - !Ref DBPassword
                  - |
                    ';
                  - 'GRANT ALL ON '
                  - !Ref DBName
                  - .* TO '
                  - !Ref DBUser
                  - |
                    '@'localhost';
                  - |
                    FLUSH PRIVILEGES;
              mode: '000400'
              owner: root
              group: root
            /tmp/create-wp-config:
              content: !Join
                - ''
                - - |
                    #!/bin/bash -xe
                  - >
                    cp /var/www/html/wordpress/wp-config-sample.php
                    /var/www/html/wordpress/wp-config.php
                  - sed -i "s/'database_name_here'/'
                  - !Ref DBName
                  - |
                    '/g" wp-config.php
                  - sed -i "s/'username_here'/'
                  - !Ref DBUser
                  - |
                    '/g" wp-config.php
                  - sed -i "s/'password_here'/'
                  - !Ref DBPassword
                  - |
                    '/g" wp-config.php
              mode: '000500'
              owner: root
              group: root
          services:
            sysvinit:
              httpd:
                enabled: 'true'
                ensureRunning: 'true'
              mysqld:
                enabled: 'true'
                ensureRunning: 'true'
        configure_wordpress:
          commands:
            01_set_mysql_root_password:
              command: !Join
                - ''
                - - mysqladmin -u root password '
                  - !Ref DBRootPassword
                  - ''''
              test: !Join
                - ''
                - - '$(mysql '
                  - !Ref DBName
                  - ' -u root --password='''
                  - !Ref DBRootPassword
                  - ''' >/dev/null 2>&1 /dev/null 2>&1
So that’s a very brief glimpse at what CloudFormation is and what it does, however we have barely scratched the surface of this widely used AWS service.
Whatever you are building with AWS (with or without CloudFormation) you can visualise the end result of your network topology by connecting your AWS account to Hava.
Hava polls your AWS configuration and creates a network topology diagram for every VPC discovered. Once the diagram is created, Hava polls your config and automatically updates the diagram, placing the superseded diagrams into a fully interactive version history.
To open a free account to evaluate Hava using Demo data, take a free 14 day trial of all the paid plans or to jump straight in and start importing and visualizing your AWS, Azure and GCP environments, click learn more above.
Read next: What is Amazon Aurora
AWS DevOps Guru is a machine learning service that monitors your AWS resources and CloudFormation stacks and alerts you when adverse conditions are...
What is AWS CAF? The cloud adoption framework is used by AWS professional services and partners to successfully transition client workloads to the...
The AWS CLI Command Line Interface allows you to interact with your AWS services and resources via the command line terminal on your local machine....