aws
What is Amazon AWS Service Catalog?
AWS Service Catalog is used to create portfolios of pre-approved AWS resources, applications and inherited IAM roles that end users can browse and...
IAM AWS Identity and Access Management is a service that allows you to create and manage users, access credentials and policies within your AWS account.
You can create IAM users and roles and attach policies that allow or deny access to the resources and data held in your AWS account.
If you are building on AWS did you know you can automate your architecture diagrams and so much more using Hava?
Instead of just sharing your root account credentials to allow access to your AWS account, you can create IAM users within your AWS account for use by trusted individuals within your organisation.
IAM users are not separate AWS accounts, they are users created within your AWS account who you create a permanent set of credentials for. Each IAM user can be assigned various permissions by attaching a permission policy so you can tightly control what they can access and what operations they can perform within your AWS account.
Within a large organisation, it can become cumbersome to individually manage access policies for individual users. IAM groups are a way to manage access for individuals with similar roles and access permission requirements.
You can simply create a group for a specific type of role or employee cohort and then add the IAM user to that group so they inherit all the permissions for that group. A common example of a group might be developers or administrators.
A user can belong to multiple groups. When a user is added to a group, the user inherits the group permissions but also retains their individual permissions that have been assigned by policies directly attached to their IAM user account.
If a user is changing roles, from say DevOps to developer or maybe developer to administrator, you can simply remove them from their old group and add them to the new group without having to go into the IAM user policy documents and adjust them manually.
Before we get any deeper into IAM Policies, you're probably here because you are building, or intending to build cloud architecture on AWS. Did you know Hava not only automates the production and updating of your AWS architecture diagrams, it also keeps track of changes, alerts you when resources are added or taken away, lets you compare architecture versions with a couple of clicks, diagrams security and also containers amongst many many other things.

You give permissions to IAM users, groups and roles by creating IAM permission policies.
There are two types of IAM policies being Managed and Inline.
Managed policies can be AWS managed or customer managed. AWS managed policies are created and managed by AWS, whereas as the name suggests, customer managed policies are ones that are created and managed by you.
Inline policies are IAM permission policies that you create and embed into a single user, role or IAM group.
A policy is declared in a JSON document. The elements within the document can be in any order. There are some elements that are mutually exclusive like Action / NotAction or Resource/NotResource.
The main IAM policy elements include:
Statement
{
“Statement”:[
**// some statement here //**
]
}
This is the main section of a policy document and can contain multiple statements and elements enclosed in a JSON block delineated by brackets.
Version
The “Version” policy element declares the policy language version. The currently available options are 2012-10-17 (the current version) or 2008-10-17. The older version is still supported but lacks some of the newer features introduced with 2012-10-17 like policy variables.
{
“Version”: “2012-10-17”,
“Statement”:[
** //Some Statement Here//**
]
}
Caution: If you do not include the Version element in your policy document, it will default to the 2008-10-17 version and will not support the newer features.
Effect
The Effect IAM policy element is mandatory and tells AWS whether this particular policy will explicitly Allow or Deny access to the particular resources declared in the statement.
{
“Version”: “2012-10-17”,
“Statement”:[
{
“Effect”: “Allow”,
}
]
}
Action
The action element defines the specific actions that will be allowed or denied by the policy statement. The Action statement is the inverse of the NotAction statement and a policy statement must include one of these, however they are mutually exclusive.
{
“Version”: “2012-10-17”,
“Statement”:[
{
“Effect”: “Allow”,
“Action”: “ec2:StartInstances”,
}]}
NotAction
This is an advanced IAM policy element that allows you to implicitly allow a large range of AWS services by explicitly declaring elements that are not allowed. For instance you could allow access to all services except IAM by defining a policy statement like:
{
“Version”: “2012-10-17”,
“Statement”:[
{
“Effect”: “Allow”,
“NotAction”: “iam:*”,
“Resource”: “*”
}]}
Or you could tie the NotAction declaration to a specific resource type:
{
“Version”: “2012-10-17”,
“Statement”:[
{
“Effect”: “Allow”,
“NotAction”: “s3:DeleteBucket”,
“Resource”: “arn:aws:s3:::*”,
}]}
In this example the policy allows users to access all the S3 operations except deleting a bucket and does not allow actions in other services outside of the defined resource (being s3)
Resource
Resource allows you to define a specific resource the policy statement refers to using the arn. The inverse declaration is the NotResource with the two elements being mutually exclusive.
The resource can be defined as exactly the individual resource identifier like:
“Resource”: “arn:aws:iam::12345678:/user/JohnDoe”
Multiple resources can be implied using a wildcard like:
“Resource”: “arn:aws:iam::12345678:/user/hr/*
The above would apply the statement to all users in the hr path.
This example allows access to all files in a specific bucket (mys3bucket) with the exception of deleting the bucket.
{
“Version”: “2012-10-17”,
“Statement”:[
{
“Effect”: “Allow”,
“NotAction”: “s3:DeleteBucket”,
“Resource”: “arn:aws:s3:::mys3bucket/*”,
}]}
NotResource
The NotResource is the opposite element to Resource. It implies the statement will be applied to everything except the resource defined in the NotResource element.
{
“Version”: “2012-10-17”,
“Statement”:[
{
“Effect”: “Deny”,
“Action”: “s3:*”,
“NotResource”: [
“arn:aws:s3:::mys3bucket/music”,
“arn:aws:s3:::mys3bucket/music/*”,
}]}
In this statement the policy holder is denied access to any S3 resources except the music folder within mys3bucket.
The advantage of using this method over implicitly Denying access to the other folders or buckets is that when new folders are created, you would need to edit the policy to implicitly deny access to the new folder, whereas in this example, the user would automatically not be granted access until the new folder was included in the NotResource element.
SID
The SID or Statement ID is an optional identifier you can include within an IAM policy to help identify the purpose of the policy statement.
{
“Version”: “2012-10-17”,
“Statement”:[
{
“Sid”: “RestrictAccessToJustMusicFolder”,
“Effect”: “Deny”,
“Action”: “s3:*”,
“NotResource”: [
“arn:aws:s3:::mys3bucket/music”,
“arn:aws:s3:::mys3bucket/music/*”,
}]}
Condition
The condition element also referred to as the condition block is optional but gives you even greater control over when a policy statement should come into effect. You can use values and boolean operators to construct arguments that must be met before the policy statement is enforced.
The format of the Condition block is:
“Condition” : { “ { Operator } ” : { “ { Key } “ : “ { Value } “ }}
ie:
“Condition” : { “StringEquals” : { “aws:username” : “alan”}}
IAM Policy Condition Operators include:
IAM Service Policy Options.
Within the IAM console you can find the Policy Summary that goes into detail on the Services, Actions available for that service and the resources that are available to include in the policy.
You can review the policy summary, which services are included and which actions are performed by reviewing the policies in the IAM console.
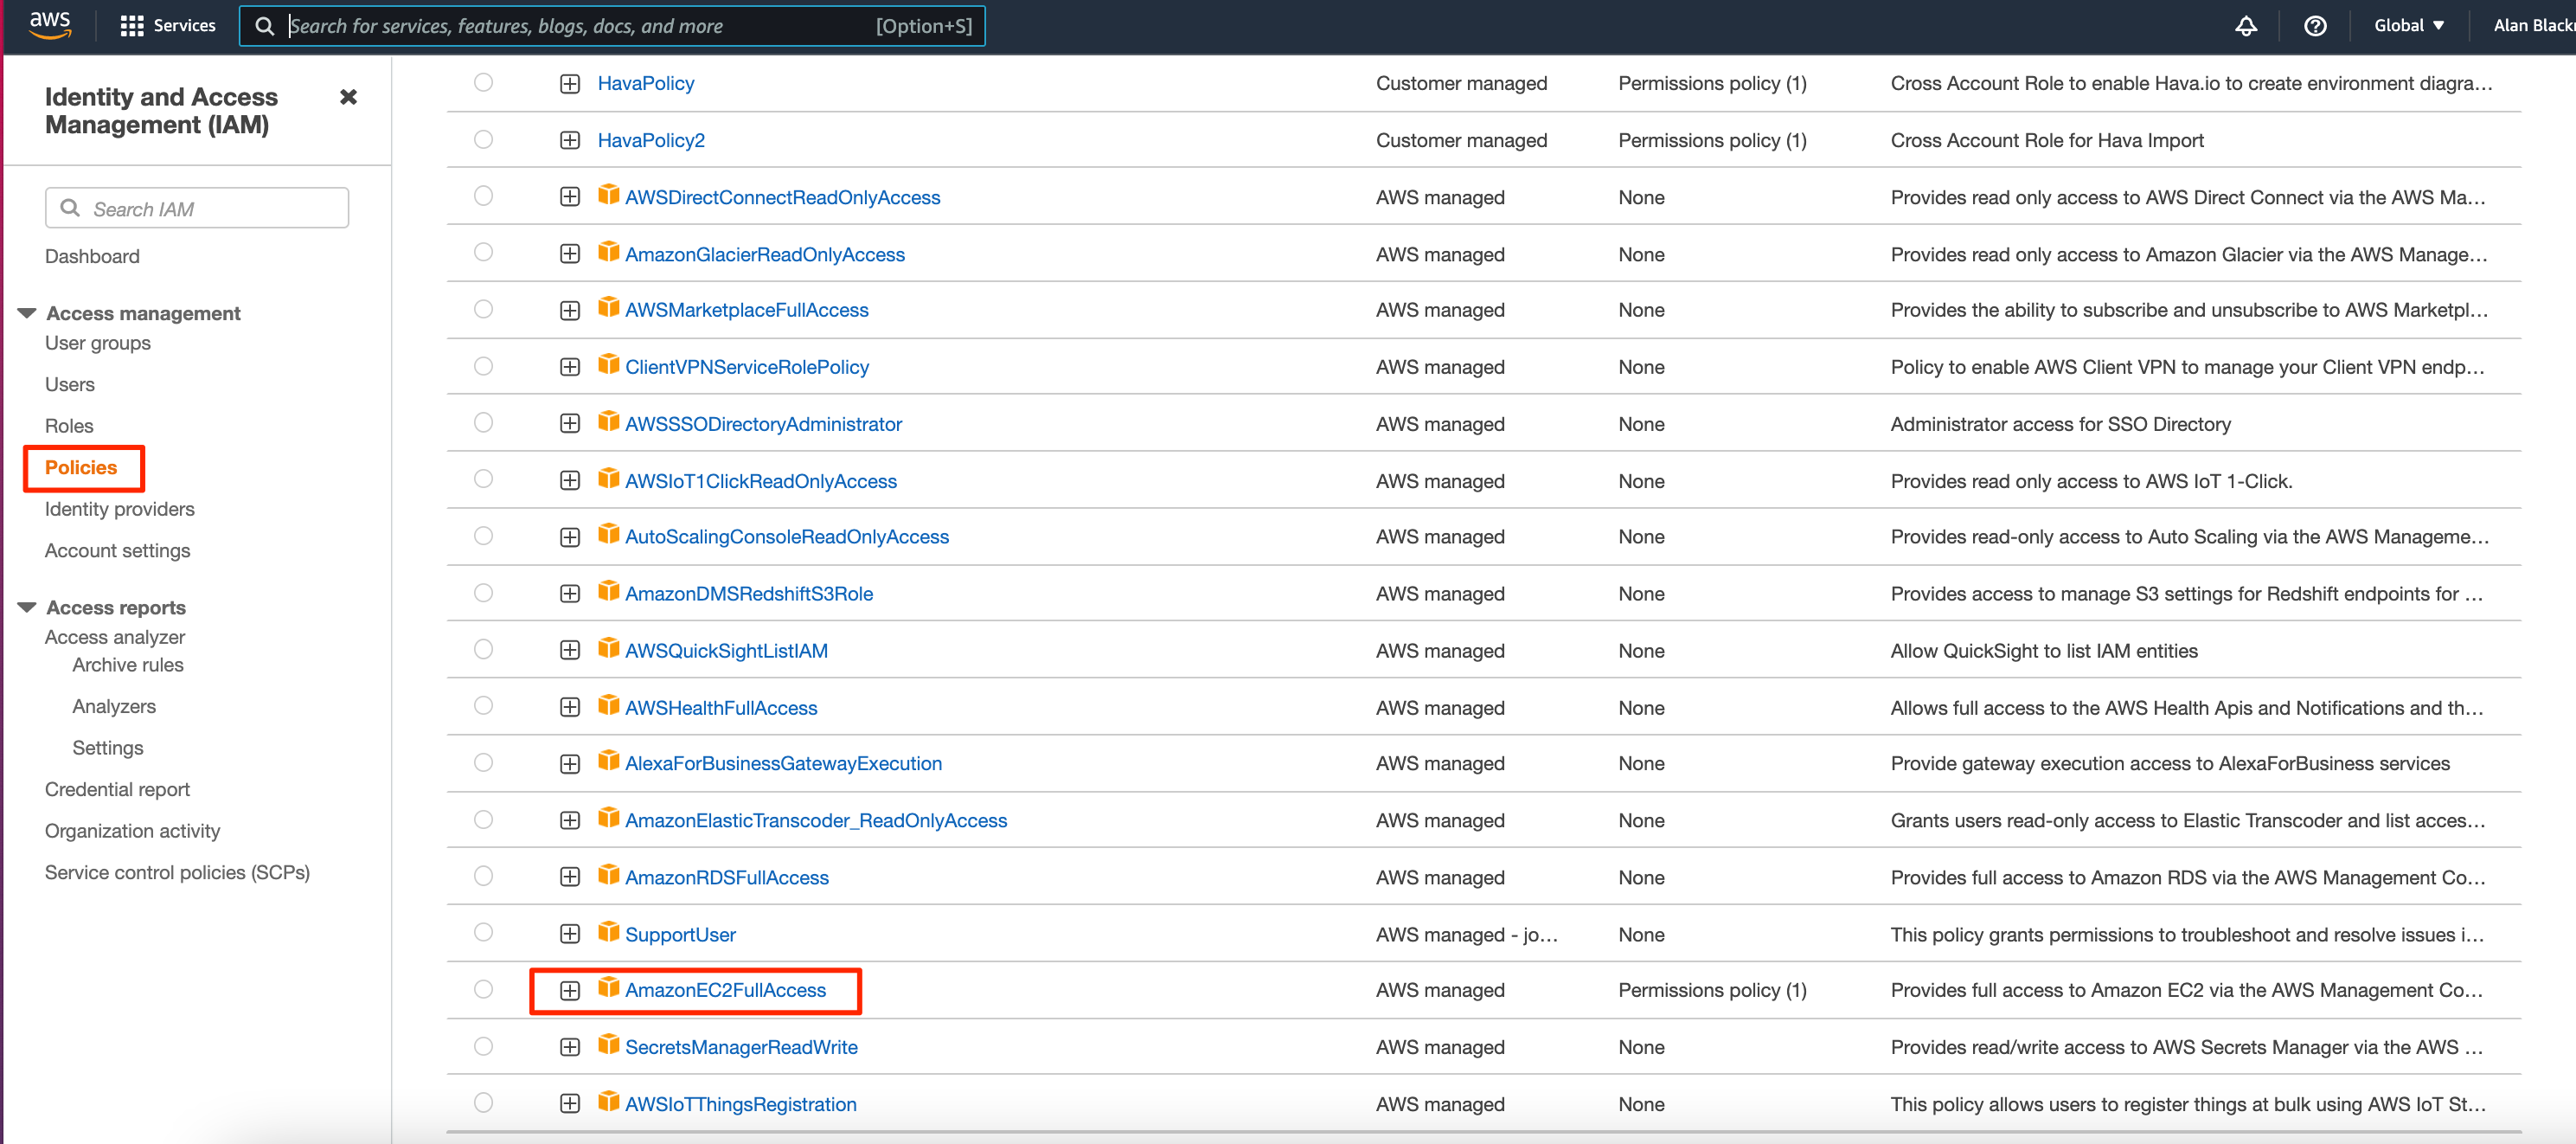
If we select the AmazonEC2FullAccess policy for instance we can toggle between the JSON policy :
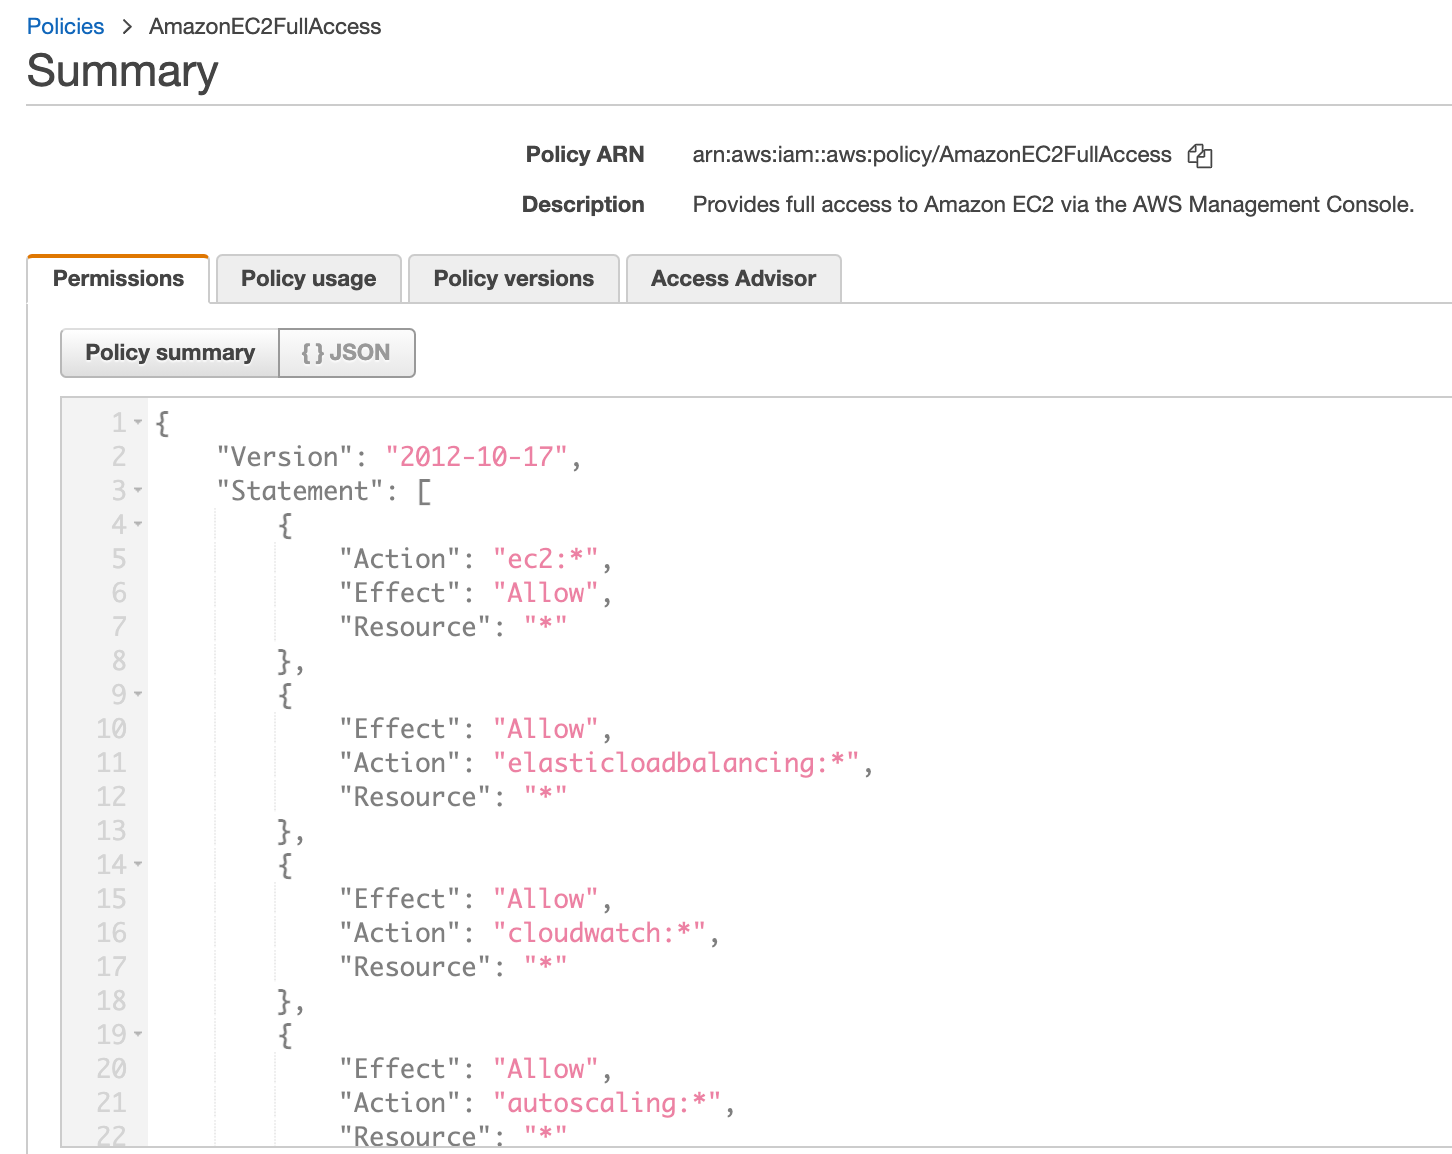
Or you can change the view to the Policy Summary which by default will list all the services allowed by the policy. You can show the remaining services here as well.
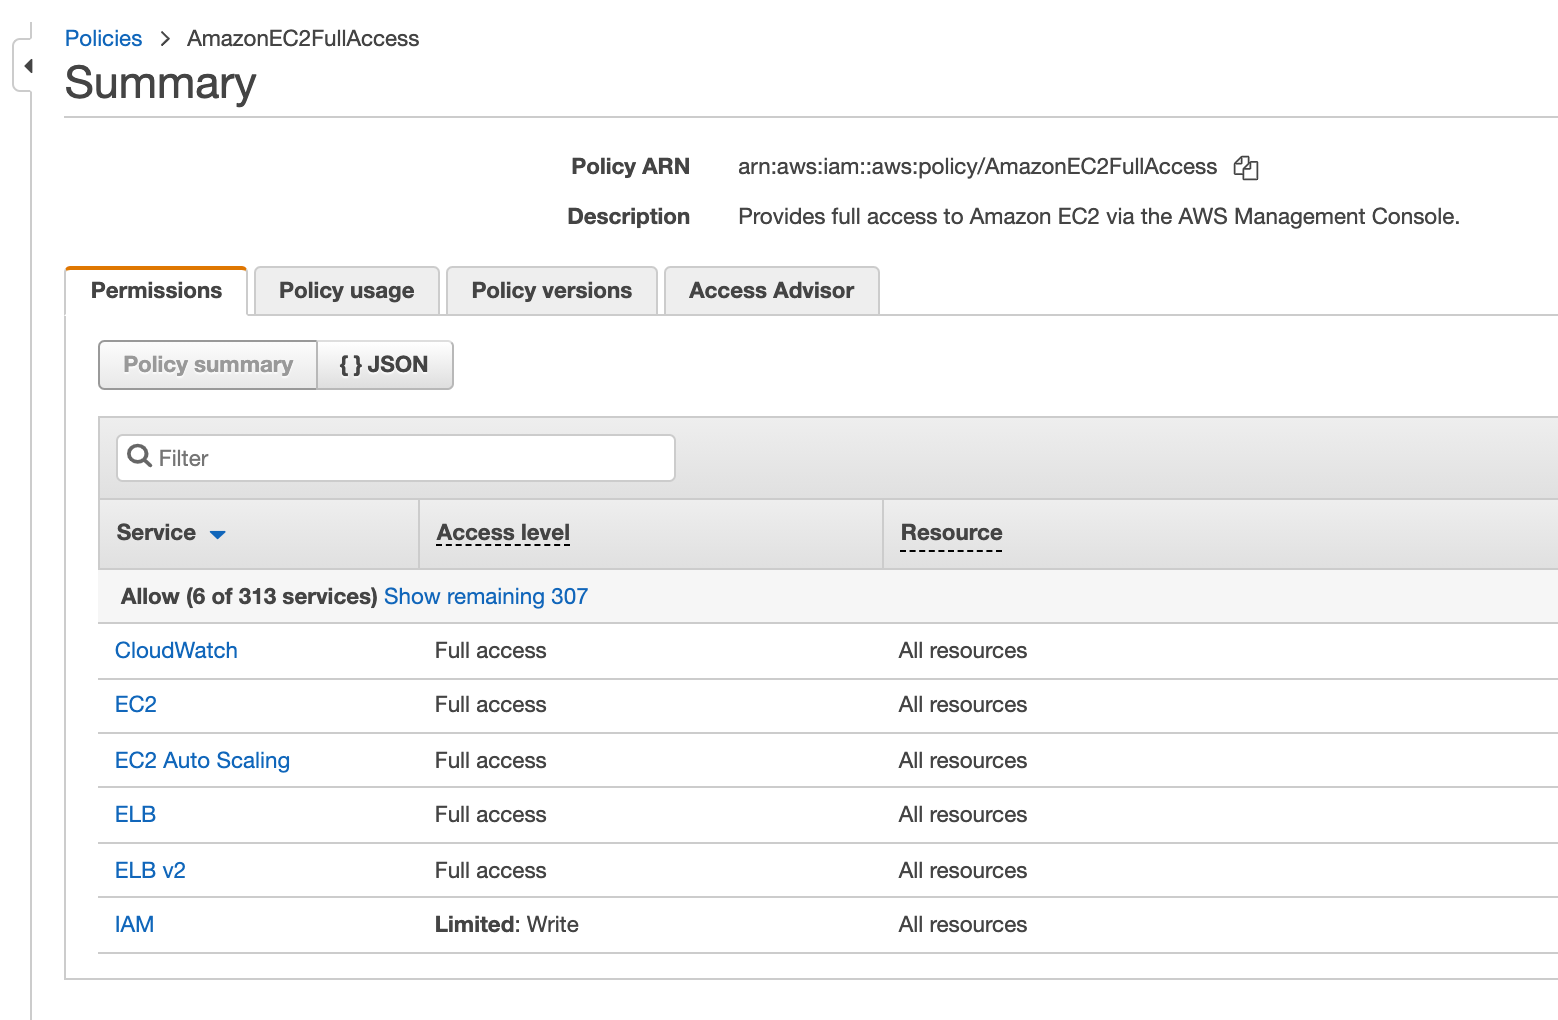
By selecting a service shown in the policy, you reveal a list of actions related to the service.

Exploring the AWS managed policies will give you a good understanding of how the IAM policy documents are constructed.
IAM Roles
IAM roles are similar to users in that they are an AWS identity with assignable permissions and trust policies that dictate what the role can and cannot access within AWS. A role is intended to be assumed by any individual users who need the permissions associated with the role.
Unlike user profiles, roles do not have permanent credentials, instead they use the AWS security token service (STS) to generate temporary certificates that expire after a nominated time period.
A Trust policy is associated with a role and defines who is able to assume a that role.
A permissions policy is also associated with a role and defines what AWS services and operations that role has access to.
An example of a service trust policy would be something like:
{
“Version”: “2012-10-17”
“Principal”: {“Service”: “ec2.amazonaws.com”},
“Action”: “sts:AssumeRole”
}
This would allow the ec2 service to assume this role.
You can set up the role to specifically allow an individual user to assume the role:
{
“Version”: “2012-10-17”
“Principal”: {“AWS”: “arn:aws:iam::123456789:user/alan”},
“Action”: “sts:AssumeRole”
}
Or allow an entire account to assume the role :
{
“Version”: “2012-10-17”
“Principal”: {“AWS”: “123456789”},
“Action”: “sts:AssumeRole”
}
Resource based IAM Policy Statements
Policy statements can be defined down to the individual resource level. Say for instance we wanted to allow users of a policy to place items in a specific s3 bucket we could :
{
“Version”: “2012-10-17”
“Statement”:[{
“Principal”: {“AWS”:[ “arn:aws:iam:123456789:root”]},
“Effect”:”Allow”,
“Action”: “[“s3”:”PutObject”, “s3”:”PutObjectAcl”]”,
“Resource”:”arn:aws:s3:::mys3bucket/*”
}]}
So that's a quick run through IAM policies and policy structure. It can be a lengthy and complex subject to master and far beyond the scope of a humble blog post, but hopefully you now have a better understanding of how IAM policies are constructed.
Of course it's safe to assume that if you are investigating IAM policies, then you are building on AWS or learning to, so documenting your AWS infrastructure might be of interest. When you have deployed AWS resources, the fastest way to diagram your AWS network is to connect your account to Hava and let Hava auto generate your infrastructure and security diagrams.
Once created, Hava keeps your diagrams up to date (also hands free) and retains superseded diagram sets in a version history, do you always have an audit trails of changes that have occurred should the worst happen.
Hava has a fully featured API, externally embeddable diagrams and can be accessed as a SaaS online or fully self-hosted.

You can find out more about Hava here:
(No CC required)
AWS Service Catalog is used to create portfolios of pre-approved AWS resources, applications and inherited IAM roles that end users can browse and...
AWS Organizations allow you to programmatically create AWS accounts, group them together for billing and centrally managed service policies. In this...
The quickest way to create an AWS diagram is to connect your AWS account to Hava and let the automation do the work. Find out how in this post.